
Wednesday, February 19, 2014
Sunday, January 19, 2014
Wednesday, December 25, 2013
LED lighting
Upper Level Layout Lighting
 |
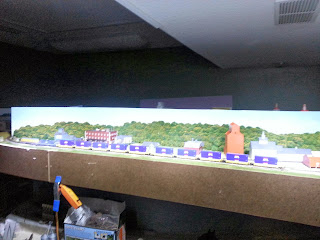
| Pleasant Hill with just room lighting |
Up until this point we really have not been worried about how to light the upper level of the layout, that is until it was built. Now that we have a great deal of the trackwork down on the upper level we really needed to look at the lighting and figure out how to match it with the rest of the layout.... LED(heat, energy used, color temperature, cost, mounting...) After doing a bit of research and experimenting with a few things here is what I have come up with . . .
As I have made a career out of entertainment lighting I knew what I was looking for, that I thought should be easy to mount to the ceiling, is directional, and can be fitted with and LED source.... welcome the ProCan MR16

It should be easy to mount to the ceiling, I could just use an MR16 LED source and then mount about 30 of them to the ceiling and run 12v around to them. Wait . . . 30, these things are $30 dollars a piece, plus the cost of the MR16 LED.... there has to be another way.
I spent about an hour spent at the home supply store, MR16 lamp in hand, looking at anything that I thought might be able to work as a lighting fixture. Finally I ended up with a PVC pipe parts in hand and some aluminum bar stock, something I could take home a try at least. After experimenting with many different PVC pieces, I figure out that a 2" PVC coupler was going to work best for the job.
Parts List;
2" PVC Couplers ($0.49)
MR16 LED (Amazon around $4.00)
Aluminum Bar Stock (4' makes 8 brackets for $0.75/bracket)
Nuts and Bolts ($0.50 per fixture)
MR16 ceramic housing ($0.65)
Total Price per fixture . . . . . . $6.39
There are more cost involved for cost of wire and connections between fixtures, but I was going to incur that cost anyway.
 |
| Here is the coupler and LED |
 |
| Face of Fixture |
 |
| One Fixture hung |
 |
| Pleasant Hill LED Lighting, Room lights OFF |
 |
| First 5 fixtures |
 |
| Layout Lighting |
 |
| Close up of LED Lit Scene |
Wednesday, November 13, 2013
Whistlestop Junction
Whistlestop Junction
(Bar Mills Models)


I had a busy week of building models while I had some time in LA, this is the Whistlestop Junction made by Bar Mills.


The roofing shingles on this model were applied as individual rows, and while the corner in the roof was a little difficult it came out looking great.


A great thing about this Bar Mills model was that it came with all sorts of small detail parts that really make the building look so much more complete.

Saturday, November 9, 2013
Roscoe Store
Roscoe Store
(Branchline Trains)


I have been busy here while in LA. This is the first of a few of the buildings I was able to mostly complete. Im not really sure where on the layout it is going to end up, but once it gets home, it needs some store interiors place in the store fronts, and then can find a home on the layout.


While every model seems to have a slightly different method for the roof, I was very disappointed with the roof on this Branchline model. It may take what seems like a year and a half to apply each row of the laser cut shingles, it looks much better than this molded roof that came with the Roscoe Store. Everything else about the model is very much what I wold expect from Branchline.


I have already added a base to the model and set up the woodland scenic checkers players outside. Now a little weathering and the interiors and this model is good to get place on the layout. Well all of that and about a 1500 mile trip back to Kansas City.
Subscribe to:
Posts (Atom)