Friday, July 20, 2012

Jefferson City Yard


I have been spending a lot of time with a soldering iron in hand building turnouts and laying the track to finish our Jefferson City Yard.


This morning I added the last two pieces of track for the yard!  the track work in the yard is complete.  Spent part of the day running locos with strings of cars over areas that have power already and cleaned up an difficult spots.  Now just a whole lot of track feeders, a couple dozen Tortoise switch machine installs, the yard diagram featuring manual throws for the Tortoises for more efficient switching, more ties added, ballasting..... at least as of right now I have the mainline and 3 yard tracks that I can use to entertain myself.
Also I started on the yard layout board, diagram, switch controls, today.  I am building it on a 1/8" x 24" x 8" piece of plastic.  The plastic had been purchased awhile ago for cnc milling and it was still around so...  


I printed out the design for it in full scale across three sheets of paper and then worked from that adding artist tape to the plastic where the track lines would be.  The plastic is naturally white, somewhat translucent, so once the track marks were down with artist tape it got a layer of black paint, tape was pulled, and then a couple coats of polycrylic to protect the paint from being torn up as easily.
All spots that represent a turnout have been drilled out to accept mini DPDT switches and then 3mm bipolar Red/Green LEDS have been added just beyond the switch to indicate which way the switch is aligned.  The is a whole lot of wiring to go on this project and its going to be a little bit of a nightmare.  Each DPDT switch will have 12v input and then have 12v output to the Tortoise, and also have to go through a 380ohm 1/4w resister to provide power for the LED indicator.  I've decided on fabricating resistor circuit board to help clean up the wiring a little, but as you can imagine, its a whole lot more soldering coming my way.


Saturday, July 7, 2012

Ribbed Covered Hopper Weathering

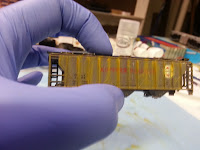
 This car is my next weathering project.  I meant to take a picture before I started but forgot.  This is a picture of the covered hopper after I have roughed up the sides a bit with a fine grit sand paper.


 I used oil paints for adding rust and streaking to the hopper.  The first layer of paint that I applied was yellow ochre.  I placed small dabs of the paint at the top of the ribs and then dragged it down with a brushed dipped in mineral spirits to cause the rusting streaks.

I repeated the process with burnt umber and burnt sienna.  Finally I added small amounts of raw umber for the rust spots.  This project now needs to sit for a day to let the oil paints dry before I add dullcote so that I can begin to add some chalk weathering

Covered Hopper Weathering Part 2

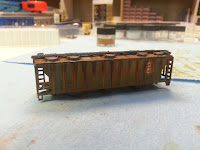
Its been a few days since I had even looked at the covered hopper that I weathered the other day, and when I finally got it back out, I decided that it needed a bit more weathering.  Today's goal was to add rust marks and rust streaks to the covered hopper.

For the rust on the car I turned to a method that I have seen over and over again in forums and blogs that I follow, except I decided to try it with acrylic paints instead of oil..... I will work with oil paint from now on, acrylic dries to fast, it had formed a shell around the blobs on the palette.  The three colors of paint I used for this project were; raw sienna, burnt umber, and raw umber.

I started by applying a small bit of raw sienna at the highest point on the car where I wanted the rust streaks to start from (where the walkway is welded to the body).  After applying the dabs of paint down one side of the car, I took a second brush dipped in thinner and dragged the paint down the side of the hopper, giving me the light colored streaks in the back.  Next, I went back with raw umber and burnt umber and reapplied paint back toward the top of the steaks and then repeated the process with thinner on a second brush.

Once the paint dries, I will spray another layer of dullcote and then attack it with another layer of chalks to fill in some areas that now look much to clean for a hopper with this amount of rust.


Tuesday, July 3, 2012

Covered Hopper Weathering


It has been a few days since I have been able to get any modeling done, but I do now have a nice new area to work on models with better lighting, and much less clutter.  Took a few days of reorganizing, cleaning, building some things, electrical..... but now I have an area that no one will be piling down with things.

My first project back is this 56' covered hopper.  I have not done much weathering in the past and decided to try my first attempt on this Bachmann covered hopper that we got in a lot of stuff.  We had two, so the first picture you see is actually the one that I have weathered sitting next to the car as it comes from Bachmann.

I worked on the weathering in stages.  First I did some washes and highlighting with the airbrush with a few different color paints (sand, dust, and a custom mix of railroad tie brown and sand).  Once the paint had dried I started working on it with chalks.  I used 4 or 5 different colors of chalk from a flesh tone to black.  I haven't touched the trucks yet, so that will be starting project for tomorrow.